How Do I Change the Code on My Safe Digital Keypad?

September 10, 2024

Digital safes offer a reliable and secure way to store valuables, but changing the code on your safe’s digital keypad is an essential part of maintaining that security. Whether you've purchased a new safe or just need to update your existing code, this step-by-step guide will show you how to change the code for different types of digital safes, along with tips on troubleshooting common issues.


Safe Installation and Repair


Why You Should Regularly Change Your Safe’s Digital Keypad Code

Changing your safe’s digital code regularly is one of the best practices for ensuring that your valuables remain secure. Here’s why:


  • Prevent Unauthorized Access: Regularly updating your code keeps intruders or unauthorized persons from accessing your safe.
  • Security Enhancement: A fresh code makes it harder for anyone to guess or hack your combination.
  • Maintain Peace of Mind: With an updated code, you'll feel more confident that your important documents and valuables are well-protected.


How to Change the Code on a Digital Safe Keypad

Each safe model can have slightly different instructions, but the following general steps should work for most digital keypads. Always consult your safe’s user manual for specific directions.


Step 1: Open the Safe

Before changing the code, the safe must be open. Use your current code to unlock it. If you have forgotten your code, you'll need to refer to your manual for resetting the code, which often involves a reset button inside the safe or using a master override key.


Step 2: Locate the Programming Button

Inside the safe door, you’ll typically find a small red or black button labeled "reset" or "program." This button is used to initiate the code-changing process.


  • Tip: On some models, this button might be behind the battery cover or concealed in a small compartment.


Step 3: Press the Reset/Program Button

Press and hold the button for 3-5 seconds until you hear a beep or see a light indicator, signaling that the safe is ready for a new code.


  • Note: The safe may beep once or flash a light to indicate it’s ready for a new entry.


Step 4: Enter Your New Code

Using the keypad, enter your desired new code. Depending on the model, the code might need to be between 4 and 10 digits long. After entering the new code, press the "#" or "Enter" button to confirm.


  • Example: If your safe requires a 6-digit code, you might enter "123456" followed by the "#" or "Enter" key.


Step 5: Confirm the New Code

Many safes require you to enter the new code a second time to confirm it. Re-enter the code and press "#" or "Enter" again to finalize the change.


  • Tip: Make sure to remember your new code or store it in a secure place to avoid getting locked out.


Troubleshooting Common Issues When Changing Safe Codes


Forgotten the Current Code

If you've forgotten the current code, you may need to use an emergency override key (if available) or consult your safe’s manual for instructions on resetting the safe to its default settings.

Safe Won’t Accept the New Code

Ensure that the batteries are functioning properly. Weak batteries can interfere with the code programming process. Replace them if necessary, then try re-entering the code.

Beeping but No Response

If the safe is beeping without accepting the new code, it could mean you're entering an invalid code length. Check your manual for the required number of digits.


Different Types of Digital Keypad Safes and Code-Changing Methods

Biometric Safes

Biometric safes use fingerprint scanning along with a digital keypad. To change the keypad code on these safes, follow the same general process but also ensure that your fingerprint is registered correctly. Some safes may require both the new code and a fingerprint scan to finalize the change.


Wall-Mounted Digital Safes

For wall-mounted safes, changing the code often involves accessing a reset button inside the door panel. Make sure you’re using the correct combination length and double-check that your new code is successfully programmed before locking the safe.


How to Enhance Your Safe's Security After Changing the Code

Once you’ve successfully changed the code, it’s essential to maximize your safe’s overall security. Here are some quick tips:


  • Use a Strong, Unique Code: Avoid common combinations like “1234” or your birth year. A complex code is harder to guess.
  • Update Regularly: Change your code every 6 months to maintain top-level security.
  • Limit Who Knows the Code: Only share the new code with trusted individuals.
  • Keep a Record in a Secure Place: Store the new code in a separate, secure location such as a password manager.


FAQs About Changing the Code on a Safe Digital Keypad


Can I change the code on my safe without opening it?

No, you generally need to open the safe to access the programming or reset button. Without opening the safe, you can't change the code.


How do I reset my safe if I forgot the code?

Most safes have a master reset option or an emergency key. Consult your safe’s manual for specific instructions on how to reset the safe if you forget the code.


How often should I change the code on my digital safe?

It’s recommended to change your safe’s code every 6-12 months, or whenever you suspect someone else may know the code.


What should I do if my safe’s keypad isn’t working after I change the code?

First, check the batteries. If that doesn't solve the problem, refer to your user manual or contact the manufacturer for troubleshooting advice.


How many digits should my safe code be?

Most safes require a code between 4-10 digits. Consult your manual for the exact requirements for your model.


Conclusion

Changing the code on your safe’s digital keypad is a simple yet essential task to ensure the security of your belongings. With the right steps and regular updates, you can maintain a secure safe for years to come. Always follow the manufacturer’s instructions and take additional precautions, such as using a complex code and updating it regularly, to keep your valuables protected.


Reasons to Install a Safe at Home

Call Us Any Time!

Call Now
By Youmna Rehman February 19, 2025
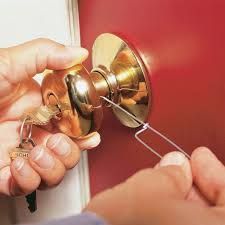
Few things are more frustrating than inserting your key into a lock, turning it as usual, and suddenly feeling it snap. A broken key in a lock can instantly turn a routine task into a stressful situation. Whether it's your home, car, or office, the inability to access your property can disrupt your day and leave you scrambling for a solution. But before you start panicking or consider replacing the lock entirely, take a deep breath. There are several effective ways to remove a broken key from a lock without causing damage. This guide will walk you through the process, helping you understand why keys break, how to remove them safely, and what steps you can take to prevent this from happening in the future. How to Fix a Stiff or Hard-to-Turn Lock Why Do Keys Break in Locks? A key breaking inside a lock is usually the result of a combination of wear and tear, force, or an issue with the lock itself. Here are some common reasons why keys snap: 1. Metal Fatigue and Weakness Keys undergo stress over time. Daily use, exposure to moisture, and bending can weaken the metal, making it prone to breaking when inserted or turned in a lock. 2. Misalignment of the Lock and Key If a lock is old, rusty, or poorly maintained, the internal components may become misaligned. This forces the key to work harder than it should, increasing the likelihood of snapping. 3. Using Excessive Force Sometimes, in frustration, people turn the key too hard when it isn’t turning smoothly. Applying extra force can cause a weak or old key to break instantly. 4. Cold Weather Conditions In freezing temperatures, metal contracts, making both keys and locks more fragile. If your key was already worn down, cold weather might push it to its breaking point. 5. Debris or Dirt in the Lock Over time, locks accumulate dust, dirt, and small debris. If these particles build up inside the lock, they can create resistance, making it harder for the key to turn properly and increasing the risk of breakage. Step-by-Step Solutions to Remove a Broken Key Safely Now that we understand why keys break, let's focus on how to remove a broken key without damaging the lock. 1. Assess the Situation First Before attempting any removal, check how much of the key is visible outside the lock. If a significant portion is sticking out, your job will be much easier. If the key is deep inside, you’ll need to use more precise techniques. 2. Try Tweezers or Needle-Nose Pliers If part of the broken key is visible, use a pair of fine-tipped tweezers or needle-nose pliers to grip and gently pull it out. However, be cautious—if your tweezers are too thick, they may push the key further into the lock, making extraction more difficult. 3. Use a Broken Key Extractor Tool Professional locksmiths use a broken key extractor, a thin tool designed to slide into the lock and hook onto the broken key's teeth. If you have one, carefully insert it along the groove of the key and pull it out slowly. 4. Apply Lubrication If the key is stuck, applying a lubricant like WD-40 or graphite powder can help loosen it. Spray a small amount into the lock and wait a minute before attempting to remove the key again. 5. The Tapping Method If gravity can work in your favor, hold the lock opening downward and gently tap it against a hard surface. Sometimes, the vibration is enough to loosen the broken key and allow it to fall out. 6. Using a Jigsaw Blade or Thin Wire If you don’t have an extractor tool, a fine jigsaw blade or thin piece of stiff wire can work in a pinch. Insert it along the broken key, try to hook onto the ridges, and gently pull it out. 7. Seek Professional Help If none of these methods work or the key is deeply lodged inside the lock, calling a professional locksmith is the best option. A locksmith has specialized tools and experience to remove the key without damaging the lock. Risks Involved in DIY Key Removal While removing a broken key yourself can save time and money, there are some risks to be aware of: Pushing the Key Further In : If you’re not careful, attempts to extract the key can accidentally push it deeper into the lock, making removal more difficult. Damaging the Lock Mechanism: Using improper tools or excessive force can bend or break internal lock components, leading to more costly repairs. Leaving Key Fragments Inside: If only part of the key is removed and small fragments remain, they can cause future problems with inserting and turning a new key. Preventive Measures: Avoiding Broken Keys in the Future To ensure you never have to deal with a broken key again, follow these simple preventive measures: 1. Regularly Inspect Your Keys If your key looks worn down, has visible cracks, or feels weaker when used, consider getting a new one before it breaks. 2. Keep Locks Clean and Lubricated Dirt and debris buildup inside a lock can make it difficult to turn the key. Clean your locks occasionally and use graphite powder or WD-40 to keep them functioning smoothly. 3. Don’t Force a Stuck Key If your key isn’t turning easily, stop and check for obstructions or try lubricating the lock before applying pressure. 4. Get a Spare Key Made Having a spare key on hand ensures that if one key gets weak, you can switch to the backup instead of pushing your luck with an old, worn-out key. 5. Upgrade to a More Durable Key or Lock Consider upgrading to a sturdier key material or even a smart lock system, which eliminates the need for physical keys altogether. Conclusion: Patience and the Right Tools Make All the Difference A broken key in a lock is undoubtedly an inconvenience, but it doesn’t have to be a disaster. By using the right techniques and tools, you can safely remove a broken key without damaging the lock. The key to success? Patience and precision. And remember—prevention is always better than cure. Taking simple steps to maintain your keys and locks can save you from this frustrating situation in the future. If you ever find yourself in doubt or dealing with a deeply lodged key, don’t hesitate to call a professional locksmith for assistance. With the right knowledge and approach, you can tackle a broken key issue with confidence and get back to your day hassle-free!
By Youmna Rehman February 15, 2025
When it comes to home security, your choice of locks can make or break your defense against intruders. Traditional locks have been the go-to for centuries, providing a simple, mechanical solution to securing doors. On the other hand, smart locks have emerged as a futuristic alternative, offering high-tech features that promise convenience and enhanced security.
By Youmna Rehman February 15, 2025
Few things are as frustrating as sitting in your car, ready to go, only to find that your key won’t turn in the ignition. Whether you’re rushing to work, picking up the kids, or just trying to run a quick errand, this unexpected issue can throw your entire day into chaos.
By Youmna Rehman February 10, 2025
A lock that is difficult to turn is not just an inconvenience—it can be a warning sign of deeper issues. Over time, locks can accumulate dust, dirt, and debris, leading to internal friction.
By Youmna Rehman February 8, 2025
Home security is a top priority for homeowners, and the first line of defense against intruders is a reliable, high-security lock. While standard locks may provide basic protection, experienced burglars can easily bypass them using common tools and techniques.
By Youmna Rehman February 8, 2025
Rekeying a lock is an essential skill that can save you time and money while enhancing your security. Whether you've recently moved into a new home, lost a key, or simply want to ensure that old keys no longer work, rekeying is a practical alternative to replacing an entire lock.
By Youmna Rehman February 8, 2025
The rise of smart home technology has brought convenience to our fingertips, and smart locks are a prime example of this innovation. No more fumbling for keys or worrying about getting locked out—smart locks allow you to enter your home with just a tap on your phone or a simple voice command.
By Youmna Rehman February 4, 2025
While both serve the purpose of securing a door, they function in distinct ways and offer different levels of security. Understanding their differences can help homeowners and business owners make the right choice for their property.
More Posts
Share by: